MIDAS Data Load
Prerequisite
The following are the prerequisite conditions for MIDAS Data Load:
-
To configure reltio tenant details, see Configure Connection.
-
To configure notification channels such as email id or MS teams channel or slack channel, see Adding Alert Notification. Configure at least one notification channel and Subscribe to the task group pipeline.
-
Keep the MIDAS data files and code file ready. Code file should be in generic code import supported layout. See to Codes sheet in this DID of MIDAS Load to Reltio in Data Interface Documents.
-
Keep MDM_Extract pipeline executed once and make sure RDM data tables are created.
-
Create a folder with name as MIDAS/input under s3 default root folder.
-
Task group MDM_Load_Refresh_Reltio_Views_Product_Master should be imported and successfully executed atleast once per OA/IDP MDM release.
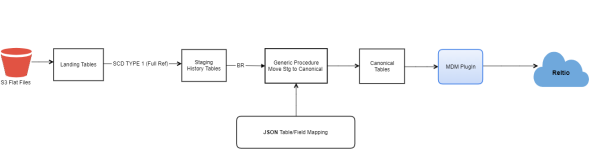
MIDAS Data Load Overview
MIDAS data is loaded to Landing and Staging tables using SCD Type1 Full Refresh.
MIDAS Data from Staging History table is transformed as intermediate views. The data from these views are loaded to canonical tables using generic procedure.
MIDAS RDM data codes are loaded till Reltio RDM tenant.
Import Pipeline Template
To Import Pipeine Template
-
Connect to IDP default s3 bucket and go to the folder bucket_name>/templates/product.
-
Download the MDM_Load_Reltio_MIDAS<version>.json file template to local windows folder.
Note:
If there are multiple files prefixed MDM_Generic_RDM_Code_Import_* with different versions, download the latest version.
-
Open the downloaded template json file with any text editor to find and replace the below placeholders with appropriate values.
Placeholder Replaceable String <RELTIO_CONN_NAME> Reltio Connection name configured in Entity Collection. For example, RELTIO_MDM <__DATABASE_NAME__> Snowflake database name used in the task group's information map plugin. Note:
The search strings given above are case-sensitive, do not enclose with any character, replace as it is.
-
Login to IDP platform with valid credentials.
-
Go to Data Pipeline app, click Task Group from Template and import the template using updated template file.
Note:
Process creates the pipeline task group after the successful import. This has to be used for execution.
-
Note that this task group execution has the capability to create MIDAS Product Reference data, which is used in data bridging applications. By default, this reference data creation is disabled. If a task group user wants to load MIDAS reference data
-
Open the task group and open the task Copy - Stage to MIDAS Reference .
-
Click Copy to Reference table.
-
Click Mapping and click
 filter of the source table.
 -
Select custom sql radio button, change the value from false to true. Save the value, step and task.
-
By setting the value as true can load the MIDAS data from staging to reference table.
-
-
To extend /add columns to MIDAS product reference bridging table (ODP_CORE_BRIDGING.MIDAS_PRODUCT_REFERENCE), follow below steps:
-
Open the task group MDM_Load_Reltio_MIDAS.
-
Open the task Create - MIDAS Product Reference table. Set the value of task parameter Add_Columns_to_MIDAS_Reference to true. Save the parameter and task.
-
Open the task Create - MIDAS Product Reference table. Open the step Add new columns to MIDAS Product Reference table and click on the edit icon (click on vertical ellipsis).
-
In the SQL text box, there is a sample procedure call statement. Update this procedure call statement parameters with column name and it'sdata type. All snowflake supported data types are supported with this procedure call. See below example to add a column name and data type. Once done save the SQL, Step and Task. If there is a need to add multiple columns then repeat the procedure call statement by adding a different column name with data type.
Adding a single column
Adding multiple columns
COMMIT; execute immediate ' begin if (@Add_Columns_to_MIDAS_Reference) then call ODP_CORE_LOG.ADD_COLUMN_IF_NOT_EXISTS(\'ODP_CORE_BRIDGING\', \'MIDAS_PRODUCT_REFERENCE\', \'MY_COLUMN\', \'VARCHAR\'); end if; end; '
COMMIT;
execute immediate '
begin
if (@Add_Columns_to_MIDAS_Reference) then
call ODP_CORE_LOG.ADD_COLUMN_IF_NOT_EXISTS(\'ODP_CORE_BRIDGING\', \'MIDAS_PRODUCT_REFERENCE\', \'MY_COLUMN\', \'VARCHAR\');
call ODP_CORE_LOG.ADD_COLUMN_IF_NOT_EXISTS(\'ODP_CORE_BRIDGING\', \'MIDAS_PRODUCT_REFERENCE\', \'MY_COLUMN2\', \'DATE\');
call ODP_CORE_LOG.ADD_COLUMN_IF_NOT_EXISTS(\'ODP_CORE_BRIDGING\', \'MIDAS_PRODUCT_REFERENCE\', \'MY_COLUMN3\', \'NUMBER(8)\');
end if;
end;
'
-
To generate BF_ID under the Manufacturer reference attribute, run the below insert query.
CopyINSERT INTO MDM_CANONICAL.CONFIG_BUSINESS_FRIENDLY_IDS(ENABLED,
CALLED_BY,
TABLE_NAME,
SCHEMA_NAME,
BF_COLUMN_NAME,
ROOT_TABLE_NAME,
ROOT_TABLE_COLUMN_NAME,
DATA_SOURCE,
BF_ID_FORMAT,
SYS_CRT_DT,
SYS_UPDT_DT)
VALUES('TRUE',
'PLUGIN',
'P_PRODUCT_ORGANIZATION',
'MDM_CANONICAL',
'BF_ID',
'P_PRODUCT',
'PRODUCT_ID',
'MIDAS',
'MDM_CANONICAL.P_PRODUCT_ORGANIZATION.SHORT_NAME ||''_''|| MDM_CANONICAL.SEQ_P_PRODUCT_ORGANIZATION_BF_ID.NEXTVAL', ---BF_ID_FORMAT CAN BE CONFIGURABLE
CURRENT_TIMESTAMP(),
Note:
To populate/overwrite BF_ID, forcefully run the below call function.
call MDM_CANONICAL.BF_IDS_UPDATE_OVERWRITE('PLUGIN', 'MIDAS', 'P_PRODUCT_ORGANIZATION');
-
Operational Steps
The following are the operational steps:
-
Keep the data files ready as per the layout defined in the MIDAS DID.
-
Login to IDP console and open the MDM_Load_Reltio_MIDAS task group.
-
Using Winscp or S3 browser, login to default S3 bucket path mentioned and go to the root folder. Place the data files inside the <s3 root folder>/MIDAS/input folder.
-
Once files are placed, click Run in IDP platform to trigger the pipeline task.
-
Click Show Execution Logs which is next to Run button for verifying the task status.
-
Monitor jobs:
-
Both Data pipeline Jobs or API call jobs used to post data to Reltio can be monitored through spring cloud data flow (SCDF).
-
To monitor, Login to IDP portal, click Data Pipeline in Landing Page.
-
Identify the Task Group/Pipeline name for which monitoring is required (example. OK_US_Data_Load). Click Show Execution Logs.
-
Spring cloud data flow page opens in a new tab. Click Jobs.
-
-
Once the tasks are completed successfully then execute the below queries to get counts of HCP, HCO, Affiliation and Merge from canonical table present in snowflake data warehouse under the schema name MDM_CANONICAL. These counts are used to validate against the counts of data posted to Reltio.
-
SELECT COUNT(0) FROM MDM_CANONICAL.P_PRODUCT where LOAD_STATUS = 'SUCCESSFUL' AND PRODUCT_TYPE = 'MedicinalProduct' AND SOURCE_NAME='MIDAS'.
-
SELECT COUNT(0) FROM MDM_CANONICAL.P_PRODUCT where LOAD_STATUS = 'SUCCESSFUL' AND PRODUCT_TYPE = 'ProductGroup' AND SOURCE_NAME='MIDAS'.
-
SELECT COUNT(0) FROM MDM_CANONICAL.P_PRODUCT_RELATIONS where LOAD_STATUS = 'SUCCESSFUL' AND SOURCE_NAME='MIDAS'.
-
Troubleshooting
-
Mapping failure issues has to be fixed in the staging to canonical configurations. Make sure that Reltio attribute and data type is matching with it.
-
In case of failure in any task, fix the error and restart the task from the failed task till the end. If unable to identify or fix the error, contact MDM support team.
See DID of MIDAS Load to Reltio in Data Interface Documents.